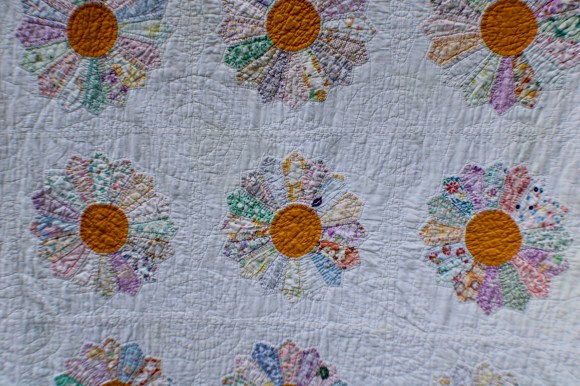
I was asked this question recently, and it led to a lot of reflection. This week, home was spending time with my husband and most of my children, even though we were in a place none of us had been before. Home has meant different things at different points in my life – the house that I grew up in where my father was also raised, a hug from my mom, a favorite meal made by my uncle or mother-in-law. As I have gotten older, many of these things are gone – the house was sold, my parents, many aunts and uncles and in-laws have passed away. I still have some favorite foods that remind me of home, but somehow it is not the same when I have to cook. But one thing takes me home in a second – a quilt. The Dresden plate shown here is from one of a pair of quilts that my Grandma Ella made with her mother and sisters. I wore out one of the pair with constant use in high school and college. As soon as I touch it, I am at home. I feel Grandma Ella’s love and remember everything she taught me. Over the years, I have made and gifted many quilts. I hope they convey my love and become a source of comfort to those I love. That is one of the best blessings I can offer you as a quilter – may your quilt become the essence of home!
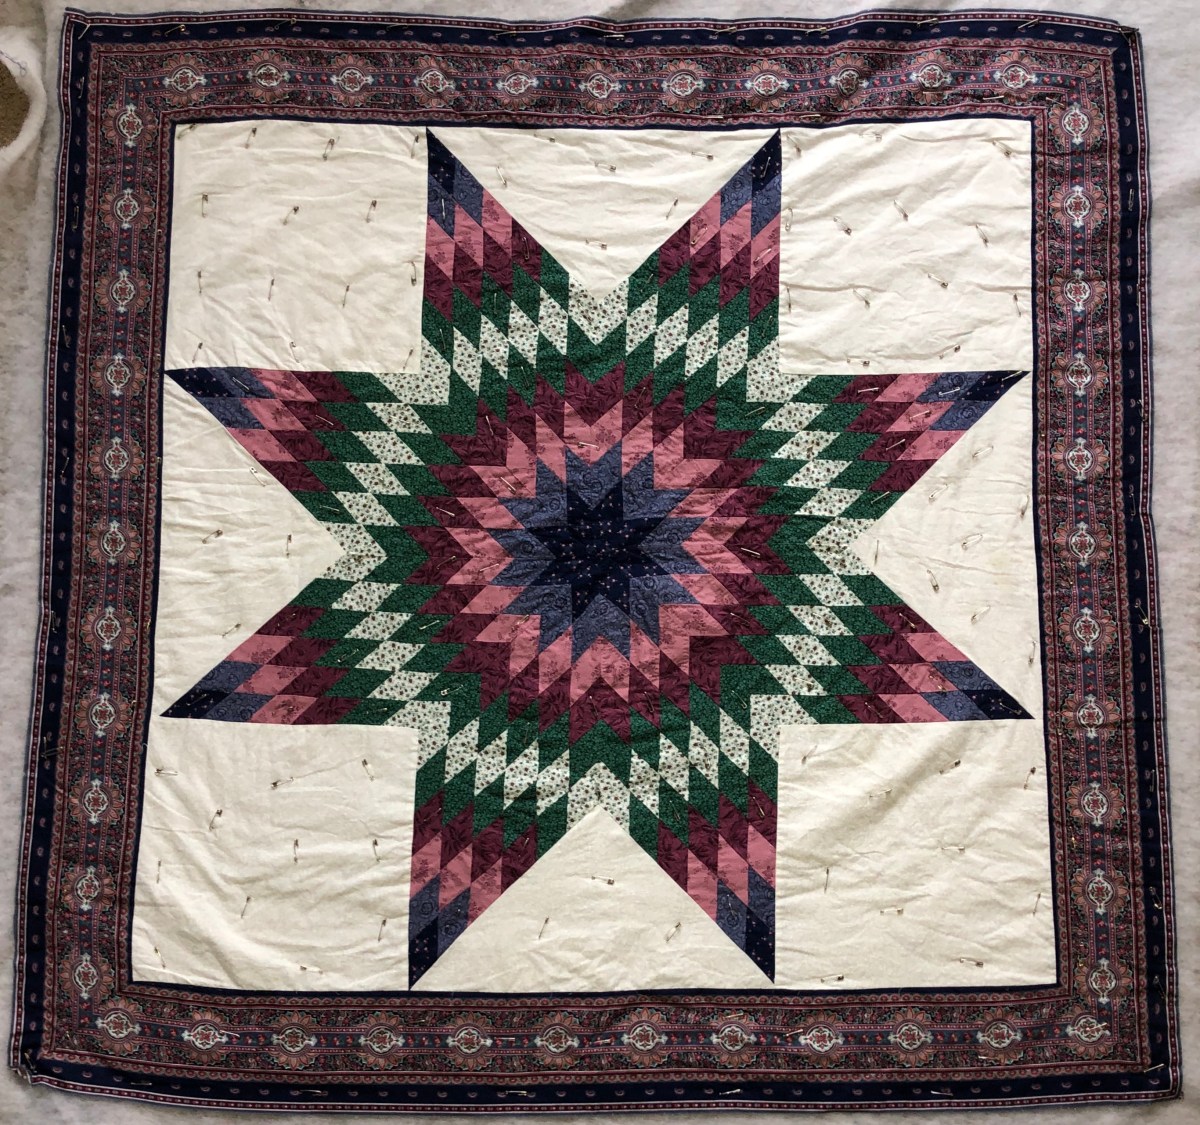
New things are always fun and exciting, and this blog is one of many new things I have started in the past month. I launched a business (Better Done Quilts), a website, and released my first quilt pattern! All while working more than full time at a day job. I am tired, but excited that all of you have decided to join me on this journey. For those who have subscribed to my e-mail, you can expect weekly blogs – usually on Tuesday or Wednesday. Blog content will include tips, tutorials, updates on works in progress (WIPs) and projects half done (PhDs) and my musings about quilts, quilters and quilting. Please comment and let me know what you like and want more of and what you don’t care about so much. Subscribers will also get pre-release information on new patterns and special discounts. The picture is of my first quilt made with a rotary cutter and rulers. I cut and pieced it around 1992-3, pin basted it, started to hand quilt it, and left it for 28 years. Stay tuned to learn the fate of this Bethlehem Star quilt!
Patty at Elm Street Quilts has this wonderful project called “One Monthly Goal”. If you click the link to her site you can read all about it. The basic premise is to set one (1, not 3 or 5 ) goal for the month. I like to set goals, and I am good at working toward both short- and long-term goals. But the idea of ONE goal was a revelation to me. I usually have multiple projects in various stages (right now I am working on 5) and the idea of making one goal seemed impossible. But I decided to try it.
I knew September would be busy with launching a business and a website, finishing one 100-day quilt, starting a new 100-day quilt as a quilt-a-long, making a new version of the Tree of Life quilt, and prepping my first quilt pattern for release (whew, I am getting tired just writing that). I wanted to make sure that other projects did not get neglected. So I turned to a quilt that is a very overdue wedding gift that always seem to be on the back burner. I had started the diamonds for my broken lone star quilt, but only had about 8 done of the 32 that were needed. My one monthly goal (or OMG) was to complete all 32 diamonds. I scheduled it on my calendar – and then moved it when other priorities came up – and then moved it again when something unplanned happened. And got to Monday, September 28th and I still had 12 diamonds to go. Because I had set the goal (and declared it publicly), I spent Monday and Tuesday evenings finishing up the last of the diamonds!
OMG worked for me – all of my big goals were achieved. And setting the OMG pushed me to make progress on another important project that was not quite so urgent.
Bottom line – Don’t let the urgent goal keep you from achieving the important one.
Here are the full instructions for the #100qal, currently on Instagram.
This is a super easy, semi-improvisational quilt with few corners to match. It works well with scraps, jelly rolls or yardage and uses 2.5 inch wide strips.
If you are like me and have been cutting your scraps into 2.5 inch strips for 5 years, you may have enough in your stash, or you may need to supplement.
All fabrics should be cut to exactly 2.5 inches wide. Seam allowances are calculated into fabric needed. **If you use precuts, make sure they are 2.5 inches or cut them to size.
King
Queen
Twin
Throw
Baby
Dimensions
104 x 96 in.
88 x 96 in.
64 x 88 in.
49 x 64 in.
32 x 48 in.
Columns (column width)
4 (26 in.)
4 (22 in.)
4 (16 in.)
2 (24.5 in.)
2 (16 in.)
Rows
48
48
44
32
Choose one of these
Yardage
18 yards
15.5 yards
10 yards
5.5 yards
Jelly Rolls
6.5
5.5
4
2
1
40 inch strips
130
110
73
40
20
Inches of strips
5088
4320
2904
1600
792
The primary directions are for a king or queen sized quilt. Other sizes will finish faster:
King or Queen 96 days of strips = 4 days to assemble
Twin 88 days of strips = 12 days to assemble (or a 90-day project)
Throw 64 days of strips = 36 days to assemble (or a 70-day project)
Baby 48 days of strips = 52 days to assemble (or a 50-day project (you could make 2!)
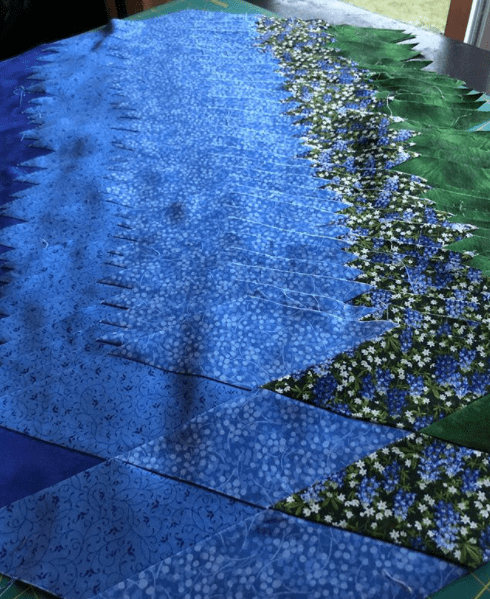
Requires two contrasting fabric choices. About half of the fabric should be foreground color (A) and about half background color (B). You can use darks and lights, colors and neutrals, two different colors, etc. Decide which fabric you want as dominant – you will need a little more of this fabric.
I am using up my stash of strips and have approximately half that are cream or white and half that are purple, blue or teal (guess which colors I use most).
Piecing Days 1-24, 26-49, 51-74, 76-99
Sew one A to one B piece, end to end. Sew second A to second B piece, end to end.
Cut so both strips are 26.5 (22.5, 16.5, 25, 16.5) inches wide – vary cuts so light and dark are not the same length. The effect is best if the dominant color is at least 1/2 of the strip length. Use the remainder for another day. Each strip should have one A and one B piece after trimming.
A
B
B
A
Sew strip 1 to strip 2 lengthwise.
A
B
B
A
That’s it!
Assembly Days 25, 50, 75, 100
Every 24 days (24, 22, 16, 12), you will have enough strip units to assemble a column for your quilt.
To assemble:
Layout your strips until you like the combination. Alternate A on right with B on right as shown.
B
A
A
B
B
A
A
B
Sew strips into columns first:
For baby quilt – two columns of 24 rows each
For throw – two columns of 32 rows each
For twin – four columns of 44 rows each
For queen and king – four columns of 48 rows each.
Then sew columns together, matching corners.
Add a border if you wish. Your top is done and ready for basting, quilting and binding!
My Grandma Ella lived in an apartment near us when I was young, and moved into our home when I was nine. For most of her adult life, she did her housework, chores and errands in the morning, and spent her time in the afternoons working on needlework. She taught me how scraps could be transformed into beautiful quilts. Grandma Ella was born in 1892 and shared her memories and stories as we worked together on sorting fabric scraps. She taught me how to make a template from a cereal box, and how to carefully cut my pieces with a good fabric scissors (she also taught me to respect the fabric scissors!). She tried to teach me hand sewing the pieces together and hand quilting, but I wasn’t very good at those parts. My favorite part was playing with the colors and shapes. I also loved the quiet companionship of our time together with fabric. As I got older, my mom let me use her 1951 Singer Featherweight and learn machine sewing, which I thought was more fun than slow hand sewing. When I was about 10 or 11, a family friend gave me her White sewing machine and cabinet so she didn’t have to move it across the country. From then on, I experimented with fabric. I created my own clothing and patterns, many of which were awful. But Grandma Ella always encouraged me to experiment and to improve my skills with each project. I also played with quilts. When I was about 14, dollhouses and miniatures were very popular and I pieced and machine quilted miniature quilts to scale for dollhouses. The local hobby store that sold dollhouse furniture bought the quilts I made and I was thrilled! It was the first “job” I had. I didn’t make a lot of money, but I loved being able to make something valuable from scraps we would have otherwise thrown away.
Bottom Line: No matter your skill level, you can always learn, grow and improve – and someone may want to buy your work!